VOXL2 PX4 HITL
Table of contents
- Introduction
- HITL
- Gazebo Setup
Introduction
In order to test the VOXL2 running PX4 the user has the option of running HITL (Hardware in the Loop) simulation.
HITL
The VOXL2 is connected to a host computer via a serial link. The host computer is running the simulation where simulated sensor readings are sent to PX4 and actuator responses (essentially, ESC commands) are sent back to the simulation.
VOXL2 supports the Gazebo simulator.
The simulation can be run in either GPS or VIO (Visual Inertial Odometry) mode.
The following requires a decent knowledge of how to run software in terminal/bash. This has also been tested on Ubuntu 20.04 only.
Gazebo Setup
Hardware requirements
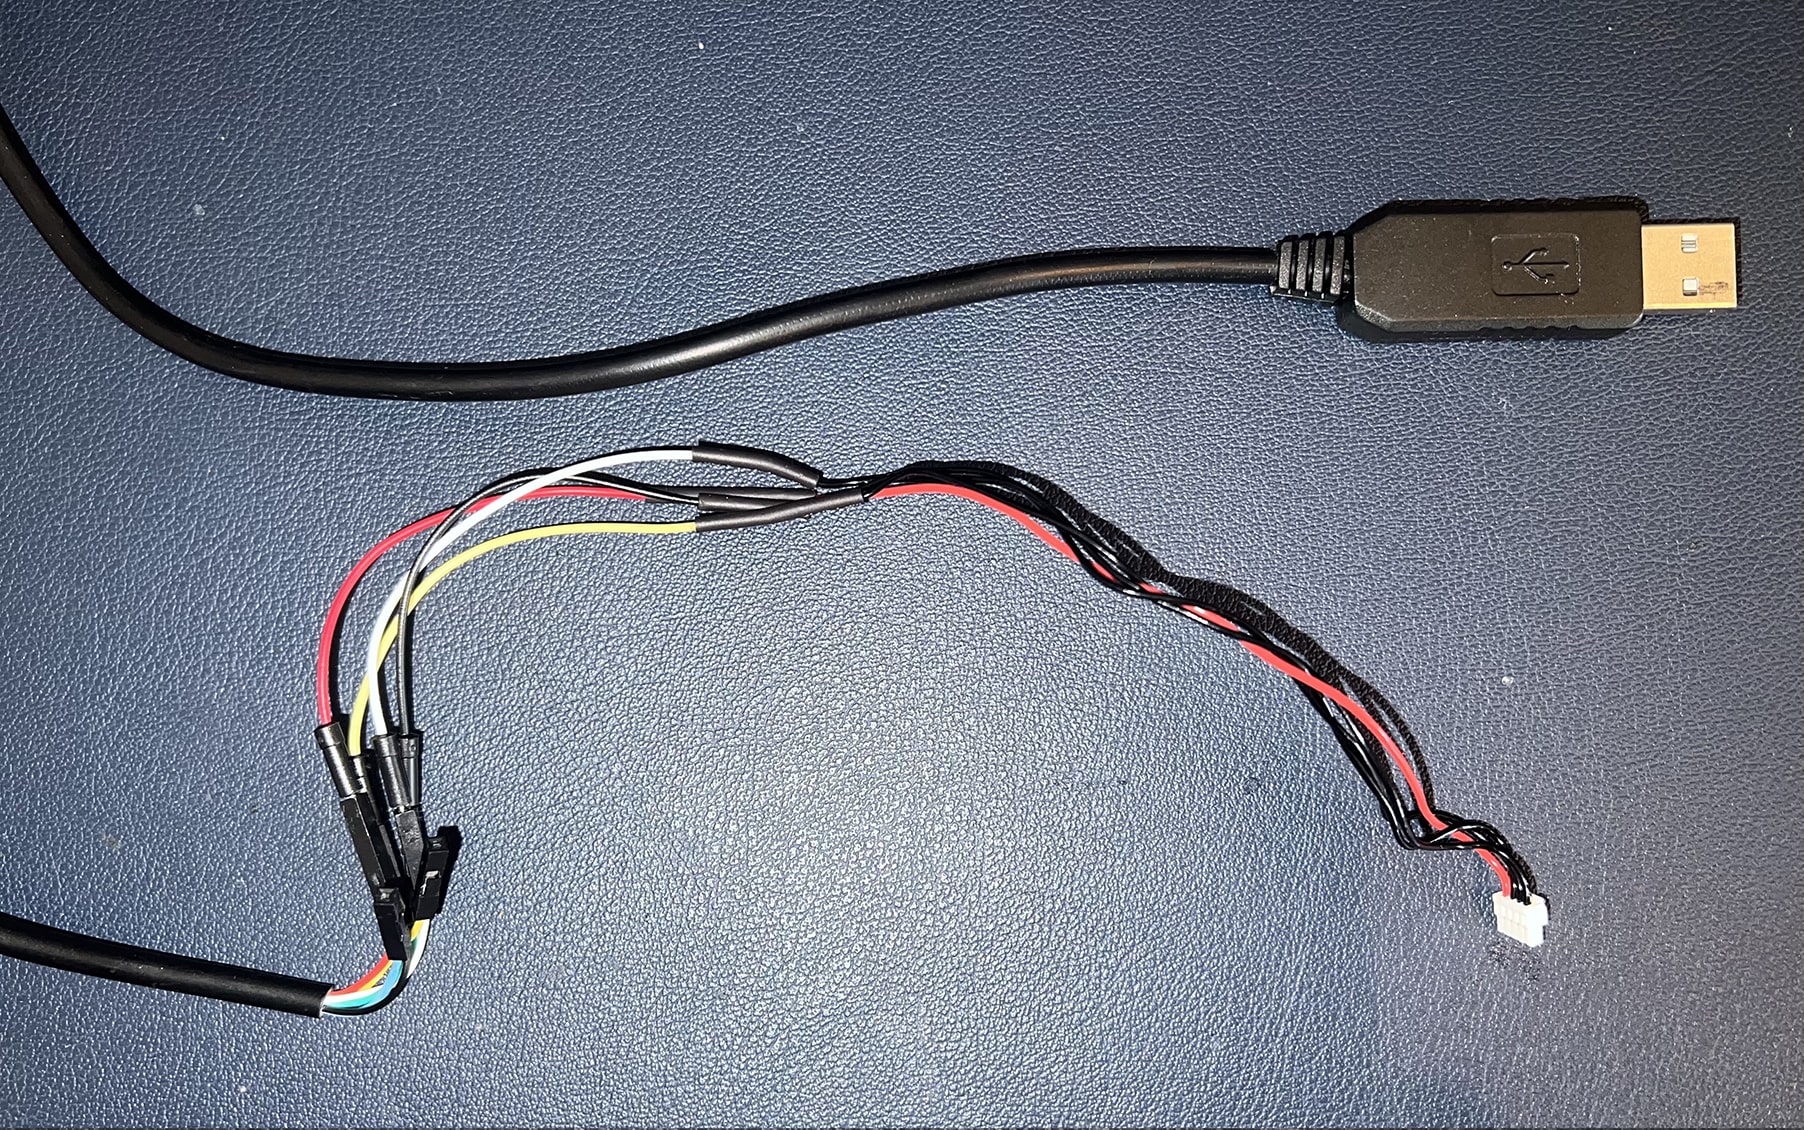
- FTDI Cable (USB to serial) connected to a 4-pin JST.
- Host computer running Ubuntu 20.04 - Note: Gazebo is computationally heavy
- VOXL2
FTDI Cable Image
Hardware setup
- Connect the FTDI USB side to your host computer and the JST connector to the VOXL2 J18 port - this can be seen in the datasheet. (PINS USED ON FTDI CABLE ARE PWR, GND, RX, & TX)
- Provided the USB side of the FTDI cable is connected to the host computer, open a terminal window and enter the following:
echo 1 | sudo tee /sys/bus/usb-serial/devices/ttyUSB0/latency_timer- This decreases the default latency associated with FTDI cables in order to meet the timing requirements of the simulation. Note: This setting will revert back to it’s default when the host computer is restarted so this step will need to be completed after each restart.
Gazebo simulator setup on host computer:
It is recommended to setup two different px4-firmware repositories - one for gazebo, and one for VOXL2 firmware. Using a single repository for both will cause conflicts between PX4 firmware and Gazebo.
git clone https://github.com/modalai/px4-firmware gazebocd gazebogit checkout voxl-mastergit submodule update --init --recursive./Tools/setup/ubuntu.shDONT_RUN=1 make px4_sitl_default gazebo- This is creating the necessary binaries to run gazebo and takes a long time to complete.source Tools/setup_gazebo.bash $(pwd)/boards/modalai/rb5-flight/gazebo_hitl $(pwd)/build/px4_sitl_default
Software setup on VOXL2
NOTE: The correct PX4 firmware required to run HITL must be flashed onto the board prior to running the commands below. PX4 version v1.4.13-modalai-rb5-flight-alpha or newer is required.
git clone https://github.com/modalai/px4-firmware hitlcd hitlgit checkout voxl-mastergit submodule update --init --recursiveadb push boards/modalai/rb5-flight/voxl-px4-hitl /etc/modalai/adb push boards/modalai/rb5-flight/voxl-px4-hitl.config /etc/modalai/adb push boards/modalai/rb5-flight/voxl-px4-hitl-vio-parameters.config /etc/modalai/adb push boards/modalai/rb5-flight/voxl-px4-hitl-gps-parameters.config /etc/modalai/adb shell chmod +x /etc/modalai/voxl-px4-hitladb shell systemctl disable voxl-px4adb shell systemctl disable voxl-mavlink-serveradb shell rm /home/linaro/eeprom/parameters- Note: This will delete any currently saved custom PX4 parameters. Back up the file if these need to be preserved!adb reboot
Running the simulation and PX4 in GPS mode
On host computer
NOTE: If the user wishes to use QGC with gazebo - this must be opened AFTER gazebo has been spun up.
- If the user wishes to use a specific GPS location, run the following in ones terminal (where XYZ represents the GPS coord): a.
export PX4_HOME_LAT=XYZb.export PX4_HOME_LON=XYZc.export PX4_HOME_ALT=XYZ gazebo boards/modalai/rb5-flight/gazebo_hitl/hitl_iris.world- Note: It is difficult to see the drone in the standard view. Choose “wireframe” from the view menu to get a better view of the drone.
On Voxl2
NOTE: The following commands are done on the voxl2 shell via adb or ssh.
In one adb/ssh shell instance
- Ensure
voxl-vision-px4is running in the background viavoxl-inspect-services /usr/bin/voxl-mavlink-server
In another adb/ssh shell instance
./etc/modalai/voxl-px4-hitlcommander takeoffcommander land
Running the simulation and PX4 in VIO mode
On host computer
NOTE: If the user wishes to use QGC with gazebo - this must be opened AFTER gazebo has been spun up.
gazebo Tools/sitl_gazebo/worlds/hitl_iris_vio.world- Note: It is difficult to see the drone in the standard view. Choose “wireframe” from the view menu to get a better view of the drone.
On Voxl2
NOTE: The following commands are done on the voxl2 shell via adb or ssh.
In one adb/ssh shell instance
- Ensure
voxl-vision-px4is running in the background viavoxl-inspect-services /usr/bin/voxl-mavlink-server
In another adb/ssh shell instance
./etc/modalai/voxl-px4-hitl -vcommander takeoffcommander land
Running test flight from the parent computer
Note: This is to be run on the computer running the gazebo instance in a seperate terminal instance. This requires this parent device to be connected to the same local network.
- Ensure that gazebo is running and the voxl2 is running its PX4 instance/receiving packets.
cd gazebo/boards/modalai/rb5-flight/gazebo_hitl/python3 -m pip install -r requirements.txtpython3 mavtest.py
This will take the drone off, proceed to go into offboard mode, fly upwards, then its relative north, and then land.
Running a mission from QGroundControl (QGC)
- Open QGC on the parent computer running the simulation.
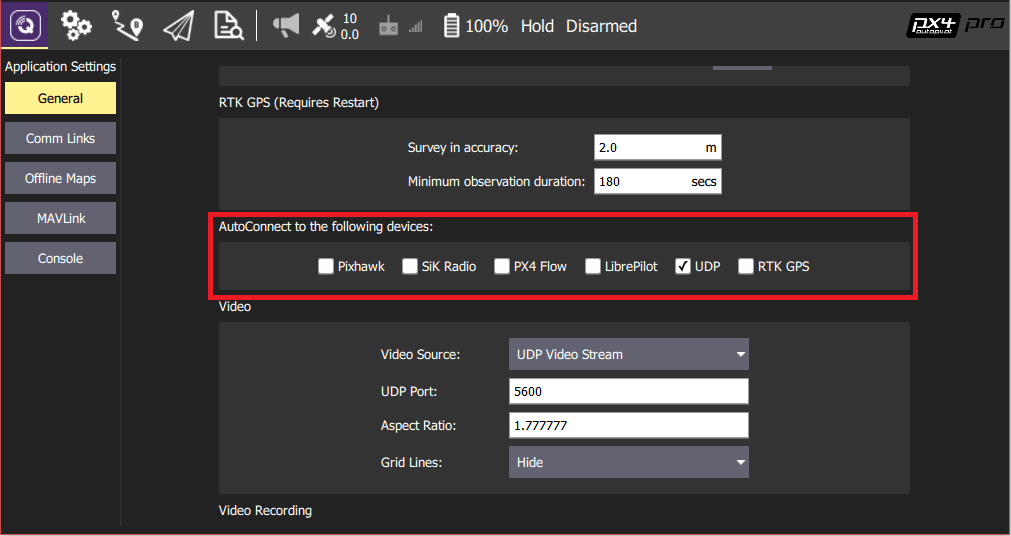
- Ensure that all AutoConnect options within the QGC settings are unchecked except for “UDP”.
- Restart QGC and upon these setting changes, the VOXL2 instance of PX4 will auto connect to QGC - Note: QGC will ALWAYS need to be opened after gazebo - this is so there are no port conflicts.
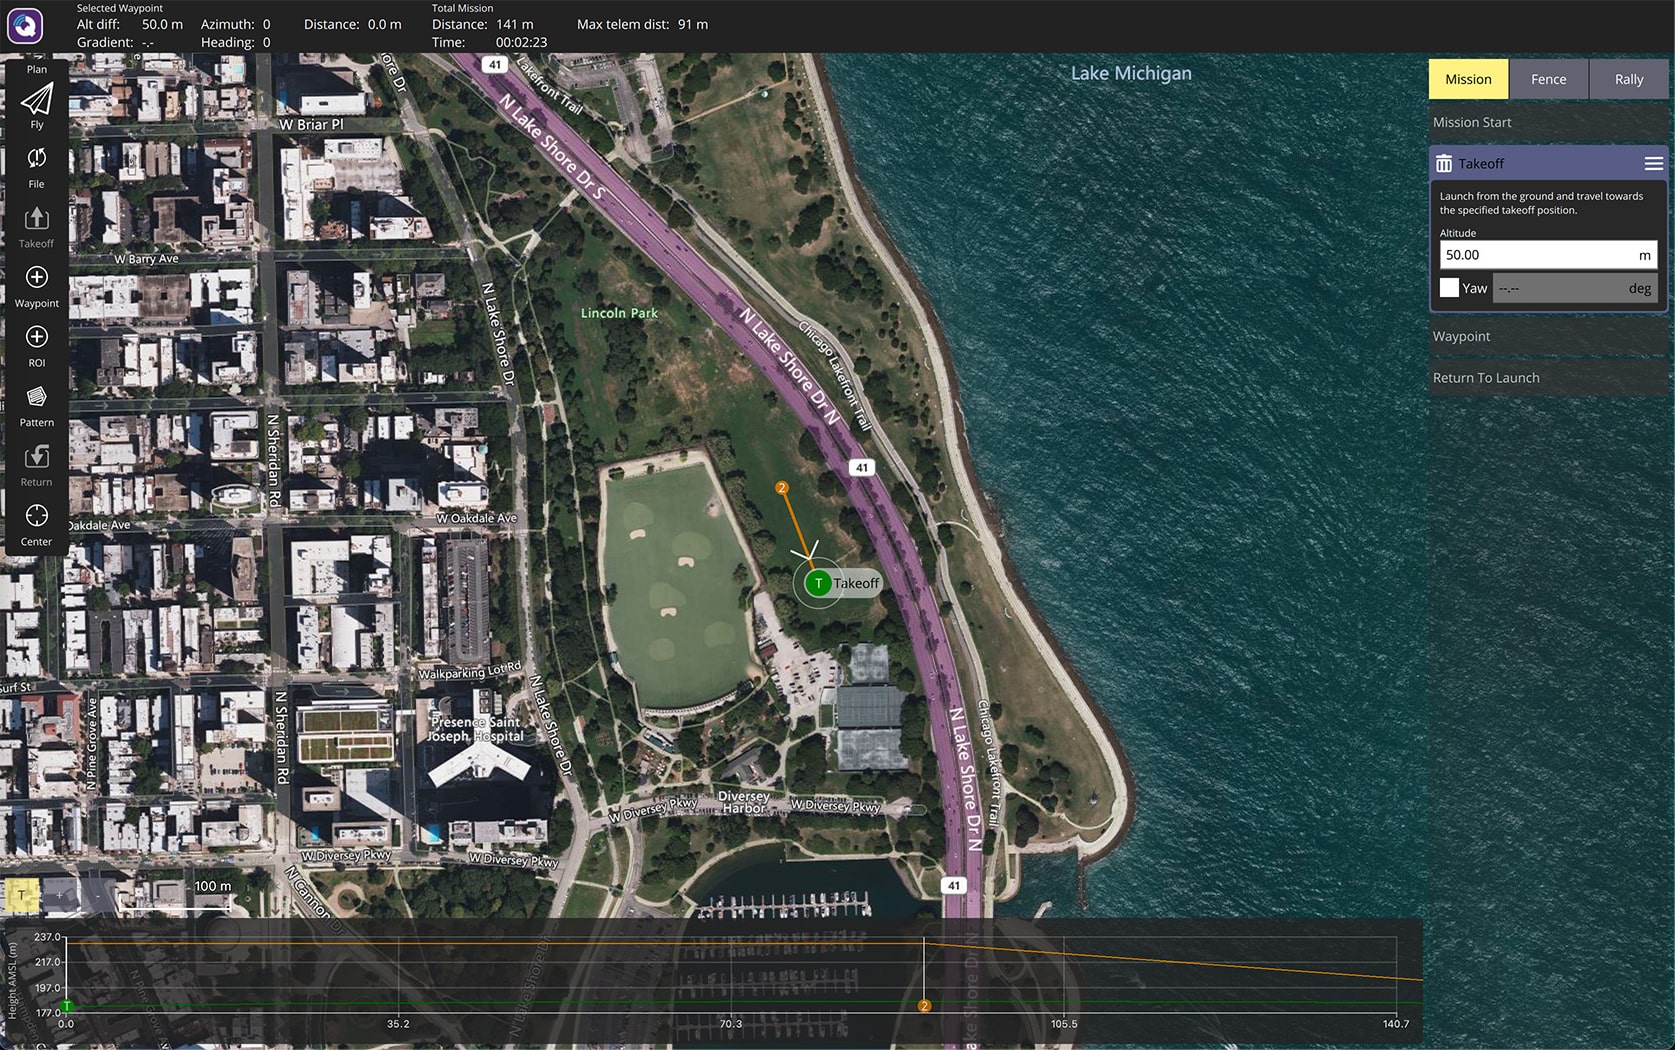
- Once connected, proceed to the top left corner of QGC, and select the Plan option within the Fly icon.
- The user can now input a mission with an initial takeoff point, waypoints, and other options. Once satisfied with the mission, proceed to select upload option. This will push the mission to the VOXL2.
- Navigate back to the original screen by selecting the Fly option in the top left of QGC, under the Plan icon.
- Now that the mission has been uploaded, the user can select to takeoff and execute the mission by sliding the icon on the bottom of QGC to confirm/execute said mission.
- Sit back and enjoy watching the mission be executed in the gazebo.