HDMI Input Accessory User Guide
Table of contents
- Overview
- Software Setup
- Initial Hardware Setup
- Hardware Startup Sequence
- Software Startup Sequence
- How to Run on Startup
Overview
The HDMI Input Accessory allows you to connect a camera with HDMI output to VOXL or VOXL Flight. The VOXL hardware powers the adapter. Using software on VOXL, you can save video to file or stream to a Ground Control Station like QGC.
** Note: ModalAi’s HDMI accessory has been discontinued and is no longer available **
Software Setup
The following are required to use the VOXL HDMI Input Accessory:
- System Image 2.5.0 or newer (currently available upon request only)
- The
voxl-v4l2package (currently available upon request only)
adb shell mkdir -p /home/root/ipk
adb push voxl-v4l2_0.0.6.ipk /home/root/ipk/

adb shell opkg install /home/root/ipk/voxl-v4l2_0.0.6.ipk
- The voxl-docker-ffmpeg image can be used. For usage, please refer to the README.
Initial Hardware Setup
- Ensure VOXL is powered off
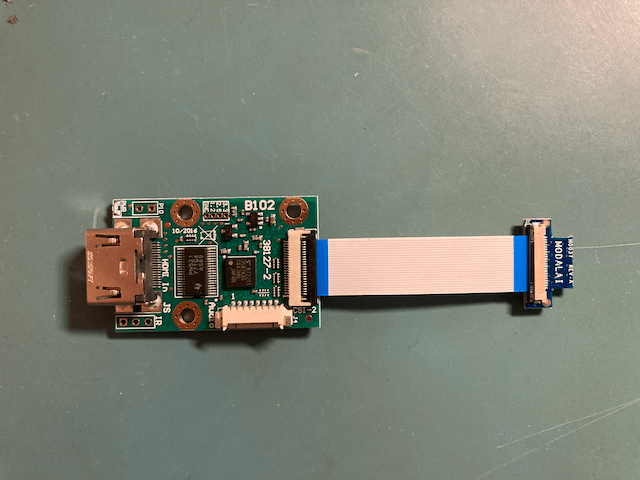
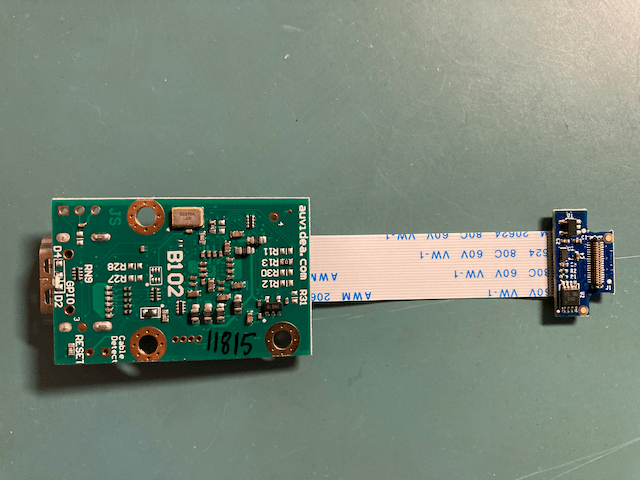
- Obtain the HDMI Input Accessory (VOXL-ACC-HDMI)
TOP
BOTTOM
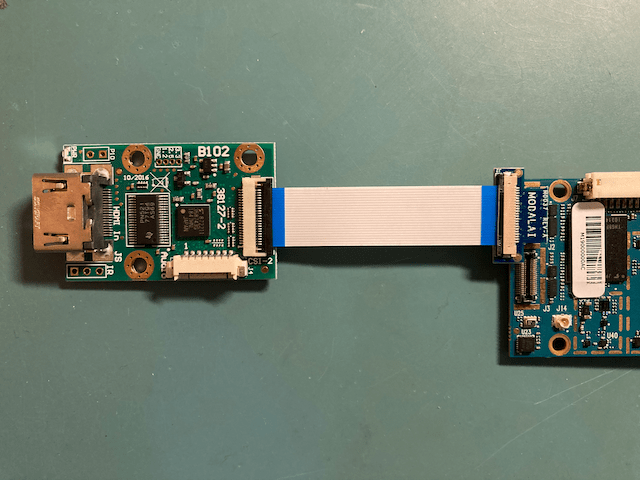
- Connect the HDMI Input Accessory’s
J1to VOXL’sJ2as shown
- Connect the HDMI cable to the input as shown
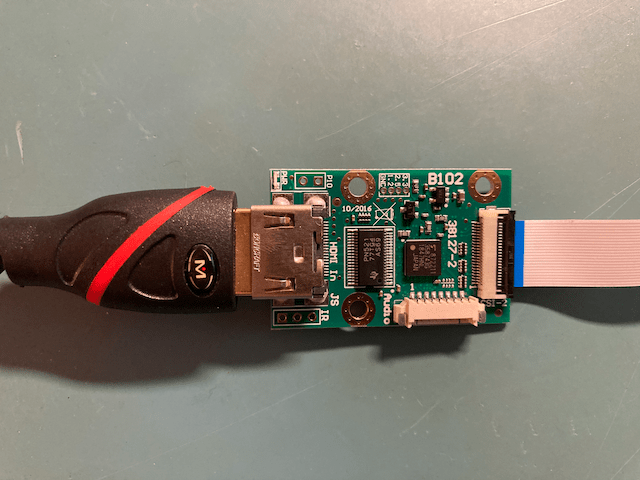
- Connect the HDMI cable to the camera, for example the Sony RX1R II
Hardware Startup Sequence
The following should be done before each use.
- Power on camera first
- Power on VOXL
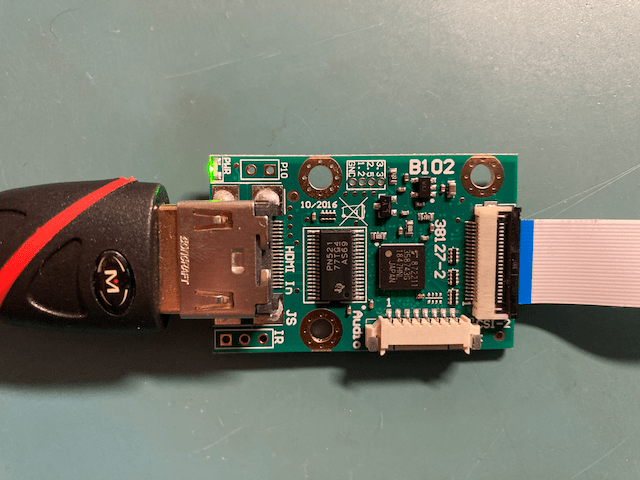
- The
PWRLED illuminates on the HDMI Input Accessory (in the upper left of this picture)
- The
Software Startup Sequence
- Ensure you have the the voxl-docker-ffmpeg image on target.
Start voxl-v4l2
- Connect to the VOXL shell
- You can validate hardware connection is OK using a
dmesgcommand:
dmesg | grep 'auvidea'

[    5.695538] auvidea_b102 probe succeeded
Start the
voxl-v4l2program, in this case with the-c sony-rx1roption and 10 FPS. This setting can be modified.Note: You can run
-hto see supported cameras.
voxl-v4l2 -c sony-rx1r -f 10
You should see the following:
 voxl-v4l2 -c sony-rx1r -f 10

Starting voxl-v4l2
sony-rx1r chosen
Frame rate: 10
Using command line frame rate 10
Info: probing for auvidea_b102
Info: device probe succeeded
Probe: sensor_name auvidea_b102
Probe: session_id 2
Info: Could not release csid device
Info: Could not power down the sensor
Waiting for DDC 5V
DDC 5V detected
Waiting for HDMI sync
Sync established!
HDMI pclk 148.080 MHz
HDMI total resolution: 2200 x 1125, active resolution: 1920 x 1080
YCbCr709 (Limited) 1080p YUV422 progressive
buffer processing thread starting
Leave this process running.
Start The ffmpeg Docker
- After approximately 10 seconds after running the last command, you can start the docker
If you pull the image from the gcr.io repository, run the following to launch the docker container:
docker run -it --rm --privileged --net=host -v /dev/frame0:/opt/frame0 gcr.io/modalai-public/voxl-ffmpeg:v1.0
Or if you built the image yourself:
docker run -it --rm --privileged --net=host -v /dev/frame0:/opt/frame0 voxl-ffmpeg:v1.0
- You will enter an interactive shell
bash-5.0#
NOTE: if you don’t run voxl-v4l2 before launching the docker container, the /dev/frame0 will not exist and the system will not work with an error similar to this
Output file is empty, nothing was encoded (check -ss / -t / -frames parameters if used)
Stream Video
Now, streaming brings with it many configurations that may or may not be valid for your use case. Details can be found at https://trac.ffmpeg.org/wiki/Encode/H.264
The following will stream <DESIRED RESOLUTION> to QGroundControl at <QGC IP ADDRESS>
ffmpeg -f rawvideo -pix_fmt uyvy422 -s:v 1920x1080 -i /opt/frame0 -vcodec libx264 -pix_fmt yuv420p -preset ultrafast -tune zerolatency -f mpegts -s:v <DESIRED RESOLUTION> udp://<QGC IP ADDRESS>:4242
For example, 640x480 to 192.168.1.124:
ffmpeg -f rawvideo -pix_fmt uyvy422 -s:v 1920x1080 -i /opt/frame0 -vcodec libx264 -pix_fmt yuv420p -preset ultrafast -tune zerolatency -f mpegts -s:v 640x480 udp://192.168.1.124:4242
You’ll see something similar to the following ouptut:
ffmpeg version 4.2.4 Copyright (c) 2000-2020 the FFmpeg developers
  built with gcc 9.2.0 (Alpine 9.2.0)

...

frame=   85 fps= 10 q=18.0 size=     135kB time=00:00:03.36 bitrate= 330.3kbits/s speed=0.398x
Additional Params to Tweak
-r- frame ratecrf- constant rate factor-minrateand-maxrate- bit rates-bufsize
-crf 10 -minrate 1M -maxrate 2M -bufsize 1M
View In QGroundControl
In this example, we are streaming to QGroundControl. You should configure the video settings with:
- Video Source:
MPEG-TS (h.264) Video Stream - UDP Port:
4242
How to Run on Startup
- Create two new files:
voxl-v4l2.service
[Unit]
Description=voxl-v4l2
SourcePath=/usr/bin/voxl-v4l2
After=sdsprpcd.service
Requires=sdsprpcd.service

[Service]
User=root
Type=simple
Restart=never
PIDFile=/run/voxl-v4l2.pid
ExecStart=/usr/bin/voxl-v4l2 -c sony-rx1r -f 10

[Install]
WantedBy=multi-user.target
ffmpeg-docker.service
- NOTE- you need to configure IP address and resolution, see
<DESIRED RESOLUTION>and<<QGC IP ADDRESS>
[Unit]
Description=ffmpeg-docker
After=docker-start.service docker-autorun.service voxl-v4l2.service
Requires=docker-start.service docker-autorun.service voxl-v4l2.service

[Service]
Restart=no
ExecStartPre=/bin/sleep 10
ExecStart=/usr/bin/docker run --rm --privileged --net=host -v /dev/frame0:/opt/frame0 gcr.io/modalai-public/voxl-ffmpeg:v1.0 ffmpeg -f rawvideo -pix_fmt uyvy422 -s:v 1920x1080 -i /opt/frame0 -vcodec libx264 -pix_fmt yuv420p -preset ultrafast -tune zerolatency -f mpegts -s:v <DESIRED RESOLUTION, e.g. 640x480> udp://<QGC IP ADDRESS>:4242
[Install]
WantedBy=multi-user.target
- Copy to VOXL:
adb push voxl-v4l2.service /etc/systemd/system
adb push ffmpeg-docker.service /etc/systemd/system
- Enable Services to run on bootup:
adb shell systemctl enable voxl-v4l2
adb shell systemctl enable ffmpeg-docker
On the next bootup, the two services will run. To start now, you can use:
adb shell systemctl start voxl-v4l2
adb shell systemctl start ffmpeg-docker
To check status:
systemctl status voxl-v4l2
systemctl status ffmpeg-docker