Microhard Add-On Board User Guide
Table of contents
Overview
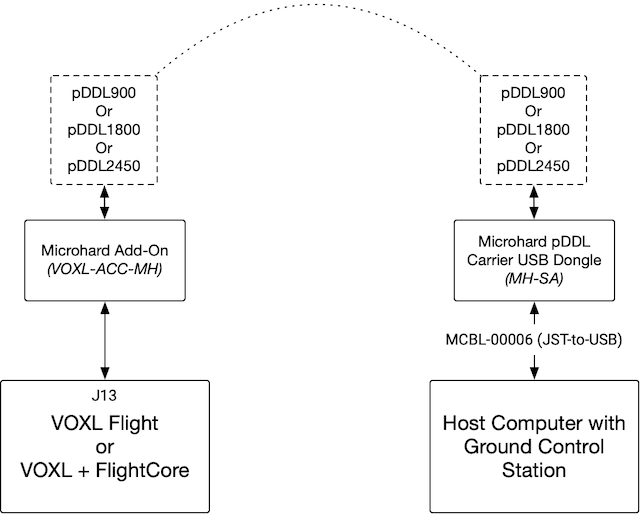
The VOXL system supports the ability to easily and quickly add a Microhard wireless connection between a vehicle and a Ground Control Station. The following guide provides you the necessary details on doing so.
Requirements
Hardware
The following hardware is required to establish a Microhard connection between VOXL and a host computer.
| Part Number | Description | Link |
|---|---|---|
| MDK-M0048-1 | VOXL Microhard Modem Add-on | Purchase |
| MDK-M0048-2 | Microhard pDDL Carrier Stand-alone USB Dongle | Purchase |
| VOXL Microhard Modem Add-on | Microhard pDDL Carrier USB Dongle |
|---|---|
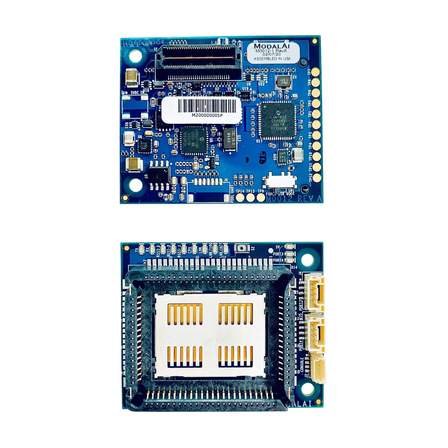 | 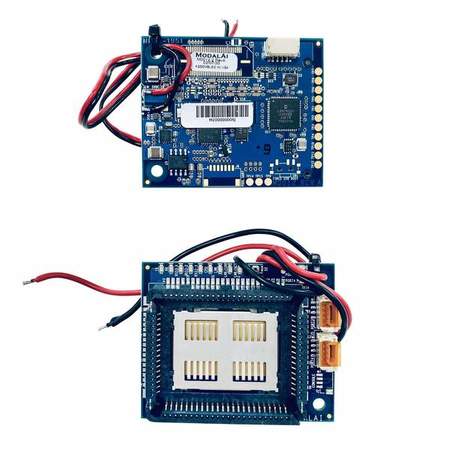 |
Hardware Setup
In order for the Microhard modules to communicate correctly, one module needs to be setup as a Master and the other needs to be setup as a Slave.
For the best performance, it is required to connect the Master to the source (e.g. VOXL, Drone, Video Source) and the Slave to the receiver (e.g. PC).
Hardware Setup - Master
- Remove power and USB from the VOXL main board
- Attach an antenna to the
ANTconnection on the Microhard Modem - Insert Microhard Modem into VOXL Microhard Modem Add-on, pin 1 should line up with the white dot on the board.
- Attach VOXL Microhard Modem Add-on to VOXL’s
J13Expansion B2B connector. - Connect VOXL to Host PC via VOXL’s
J8Micro USB connector - Power VOXL.
Hardware Setup - Slave
- Attach an antenna to the
ANTconnection on the Microhard Modem - Insert Microhard Modem into the Microhard pDDL Carrier USB Dongle, pin 1 should line up with the white dot on the board.
- Connect the Microhard USB Dongle to the host PC via the single
To USB Hostconnector on the bottom of the board - Power the board.
Software Setup
In order to establish a link between the Microhard Modems in a quick and easy way, we can take advantage of the VOXL Microhard Modem Add-on and Microhard pDDL Carrier USB Dongle’s S2 buttons, which act as “reset” buttons for the Microhard Modems.
Before starting, make sure both the VOXL and Microhard pDDL Carrier USB Dongle are powered by following the steps above.
VOXL Add-on
In order to enable the VOXL Microhard Add-on board, the following software is required and should already be pre-installed:
voxl-configure-modem allows you to quickly and easily bring up a Microhard modem.
NOTE: If using System Image 3.8.0+ on VOXL, voxl-modem_0.16.0+ is required (SDK 0.8.0+)
# On VOXL
voxl-configure-modem
You will first be asked which modem type you are setting up:
What type of modem are you using?

If you are unsure of which modem you have, take a look at the following datasheets:

v1 LTE Modem: https://docs.modalai.com/lte-modem-and-usb-add-on-datasheet/
v2 LTE Modem: https://docs.modalai.com/lte-modem-and-usb-add-on-v2-datasheet/
Microhard Modem: https://docs.modalai.com/microhard-add-on-datasheet/

1) v1
2) v2
3) microhard
Choose 3 for microhard.
You will then be asked for the IP address that you would like to be assigned to your VOXL on the Microhard network.
Enter the IP address you would like to the VOXL to use on the Microhard network:
Note: The chosen IP address must be of the form: 192.168.168.XXX, where XXX is a 3 digit number

Default - 192.168.168.100

1) default
2) custom
Once you choose your IP address, the VOXL will configure the service files that enable Microhard connection on bootup.
Making new interface file /etc/network/interfaces
reloading systemd services
enabling voxl-modem systemd service
starting voxl-modem systemd service
DONE configuring voxl-modem
Now that you have enabled the VOXL’s software to handle the Microhard modem, press and hold the S2 button on the VOXL Microhard Add-on board for at least 10 seconds, then release. The module will then reset all settings to the default values required for a Master module. This module will be assigned a default IP address of 192.168.168.1
After a short time your VOXL will be connected to the Microhard network. You will now be able to reboot your VOXL and have it connect to the Microhard network automatically.
Standalone
The process for configuring the standalone Microhard board is simple:
- Press and hold the
S2button on the Microhard pDDL Carrier USB Dongle for 5 seconds, then release. The module will then reset all settings to the default values required for a Slave module. This module will be assigned a default IP address of192.168.168.2
Once both Microhard modems have been configured, the two should now automatically connect to each other.
Connecting to QGroundControl
The VOXL system uses the voxl-vision-px4 service on VOXL to establish a connection between PX4 and QGroundControl over UDP. This is supported on VOXL Flight or when using Flight Core with VOXL (using this procedure).
Locate the IP address of the host PC that has been assigned to it by the Microhard modem. An example output is below:
$ ifconfig

enp1s0    Link encap:Ethernet  HWaddr 48:D7:05:EA:06:36
          inet addr:192.168.168.135  Bcast:192.168.168.255  Mask:255.255.255.0
          inet6 addr: fe80::4ad7:5ff:feea:636/64 Scope:Link
          UP BROADCAST RUNNING MULTICAST  MTU:1500  Metric:1
          RX packets:125 errors:0 dropped:0 overruns:0 frame:0
          TX packets:247 errors:0 dropped:0 overruns:0 carrier:0
          collisions:0 txqueuelen:1000
          RX bytes:13399 (13.0 KiB)  TX bytes:31491 (30.7 KiB)
In this case, the IP address of the host PC is 192.168.168.135
If you have not yet setup voxl-vision-px4 on your VOXL, do the following:
# On Host PC
$ adb shell

# On VOXL
yocto:/home/root# voxl-configure-vision-px4
You will be asked a variety of questions about the camera configuration (if any) and physical configuration of your drone (if any). Answer these questions with the options that best describe your setup, you can select no cameras as an option.
- When asked for the IP address for QGroundControl, you’ll use
192.168.168.135in this example
If you have already configured voxl-vision-px4, you can edit the configuration file as needed. Run the following command and update the qgc_ip field to match the GCS computer’s IP, in this example 192.168.168.135
yocto:/home/root# vi /etc/modalai/voxl-vision-px4.conf
If you’ve modified the config file, reset the voxl-vision-px4 service and reload the configuration by running the following command:
yocto:/home/root# systemctl restart voxl-vision-px4